Galapagos: OSX Terminal Based Volume Utility
What is it?
Program used to control the volume in a Curses like interface for OSX.

Demonstration of setting the volume via the terminal based GUI.
Tell me more!
Galapagos Volume is a wrapper utility for setting the volume in OSX. It works by calling applescript commands in a subprocess to set the volume. There are a couple of ways to use Galapagos Volume, the first is by just running the program without any parameters this will produce a GUI that allows you to increase or decrease the volume for input and output. The second is with the flags -d -device, and -v -volume. If you specify a "-d output" or a "-d input" the system will return the volume for that device. For example, "volume -d output" will return the output volume. If you specify a device and a volume, the system will SET the volume for that device. Therefore a sample command to set the output would be "volume -d output -v 85", this would set the output volume to 85.
The Source Code
How do I install it?
Download Galapagos, chmod +x the the file, and then run it! Alternatively to install from source, or to view the full installation instructions, checkout the repository: here.
The Need
There is currently a way to change the volume in OS X via the command line, but it is cumbersome and unintuitive. I wanted to improve upon that method. These kinds of tools are important for maintaining a mental context, whenever you have to switch away from the active window you are breaking the mental context and will suffer a performance when trying to get back to what you are doing. If you can contain everything within one window, and do so conveniently without hassle (e.g. terminal tabs) you can have greatly improved focus and performance.
The Original Method
The original method looks like this:
- Get volume
- Echos a number from 0 to 100
- osascript -e 'output volume of (get volume settings)'
- Set volume
- Where 50 is a number from 0 to 100
- osascript -e 'set volume output volume 50'
- Get mute state
- Echos a string of 'true' or 'false'
- osascript -e 'output muted of (get volume settings)'
- Set mute state
- Where 'true' can be 'true' or 'false'
- osascript -e 'set volume output muted true'
Src: https://coderwall.com/p/22p0ja/set-get-osx-volume-mute-from-the-command-line
The New Method / Galapagos Usage
- volume
- When started from the command line with no arguments, volume will produce a terminal GUI
- volume -v 80
- set the volume to 80/100
- volume -v 65 -d input
- set the input volume to 65/100
- volume -d input
- show the input volume
The Development Story
The development story for this application was rather rough. It started off with merely learning how to call commands to set the volume in OS X via applescript. That is done in the following way
osascript -e 'output volume of (get volume settings)'
Knowing this, the dream was to eventually develop something similar to alsamixer within the console. It always seemed super great to me that you could do literally everything from a terminal if you wanted.
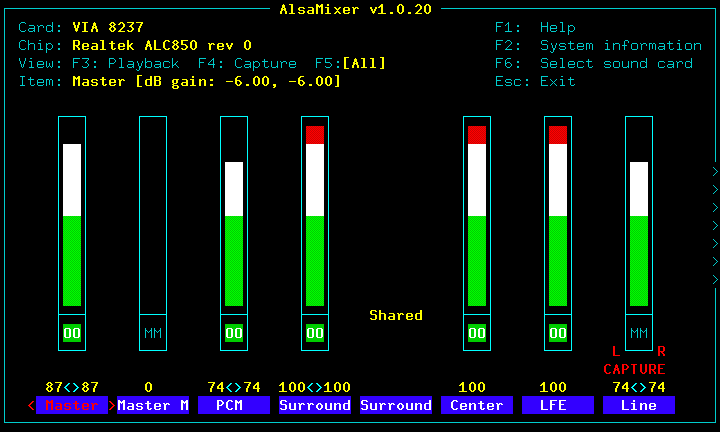
https://en.wikipedia.org/wiki/Alsamixer#/media/File:Alsamixer.png
This was a great interface, but it was overkill for what I was trying to do. Within applescript you are very limited in how you may manipulate the audio devices. Essentially you can only change the input and output volume. Despite this limitation I designed the application to be largely modular and changeable when the time arises that there is a new interface, or a new way of changing the volume discovered. To that end, I made an abstract AudioDevice class which looks like the following:
Class AudioDevice
# Represents an OSX audio device, e.g. input, output
class AudioDevice:
    """
    A class responsible for representing & manipulating OSX audio devices
    """
    def __init__(self, name, set_volume_command, get_volume_command):
        self.name = name
        self.set_volume_command = set_volume_command
        self.get_volume_command = get_volume_command
        self.volume = self.get_volume()
    def set_volume(self, volume):
        # Constrain Volume to Valid Range
        if (volume > 100):
            volume = 100
        if (volume < 0):
            volume = 0
        # Copy Command arguments list into local version for modification
        local_command = self.set_volume_command[:]
        local_command[2] = self.set_volume_command[2].format(volume)
        process = subprocess.Popen(local_command, stdout = subprocess.PIPE)
        out, err = process.communicate()
        self.volume = volume
    def get_volume(self):
        process = subprocess.Popen(self.get_volume_command, stdout = subprocess.PIPE)
        out, err = process.communicate()
        # Set Local volume to reflect system reported volume
        self.volume = int(out)
        return self.volume
This class accepts abstract commands for setting and getting the volume. If the API for apple ever changes, then the controller which instantiates the audio devices only needs to change. The model that does these operations looks like this:
Class VolumeModel
# Represents the Data in the program
class VolumeModel:
    """
    Populating the default OSX AudioDevices
    """
    def __init__(self):
        # List of audio devices
        audio_devices = self.audio_devices = []
        # AudioDevice Output
        get_volume_command = ['osascript', '-e', 'output volume of (get volume settings)']
        set_volume_command = ['osascript', '-e', 'set volume output volume {}']
        device = AudioDevice("Output", set_volume_command, get_volume_command)
        audio_devices.append(device)
        # AudioDevice Input
        get_volume_command = ['osascript', '-e', 'input volume of (get volume settings)']
        set_volume_command = ['osascript', '-e', 'set volume input volume {}']
        device = AudioDevice("Input", set_volume_command, get_volume_command)
        audio_devices.append(device)
    def get_audio_devices(self):
        return self.audio_devices
As you can see, it initiates two audio devices, one for input and one for output. The two audio devices accept the shell command for getting and setting the volume as parameters. Finally with these two elements in place I could begin the execution of code to the terminal to alter the volume. To achieve this I used python subprocess, essentially what would occur is my AudioDevice would execute its' appropriate command in a subprocess.
At this point it was possible to write a command line only application, but I decided to take it further and make it look like a terminal GUI. To do this, I originally used the library built into Python that wraps ncurses. This library was very fragile, didn't handle resizing properly, had no abstract way to make widgets, and generally suffered from differences across terminals and systems.
Due to the aforementioned issues, I ended up using the library Urwid (http://urwid.org). This library was very powerful, it allows terminal resizing, all sorts of custom widgets and behavior, and it works great. Checkout some of the examples in their documentation for what they can do.
Finally after setting up a model, a controller, and a view, I had a full application, feel free to check out the source code, it is well documented!
What does it look like?
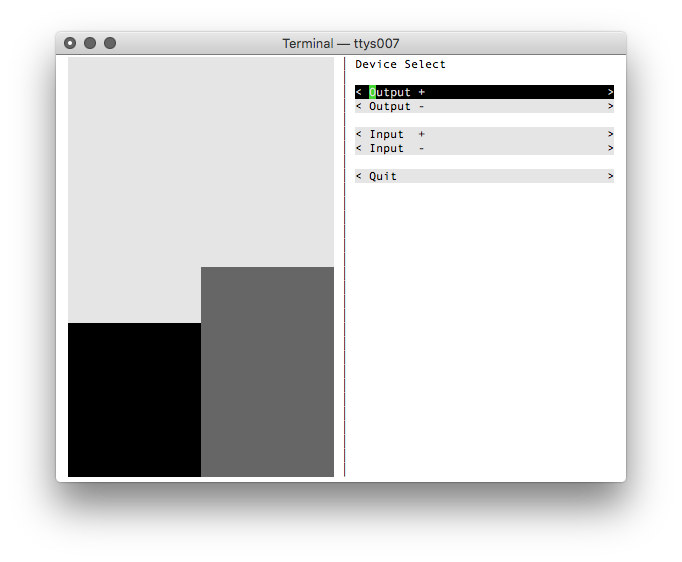
Changing the output volume (black bar)
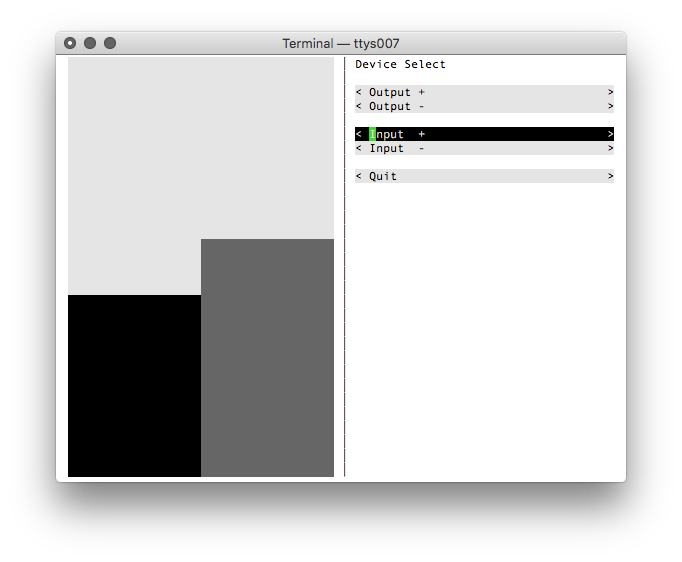
Changing the input volume (gray bar)
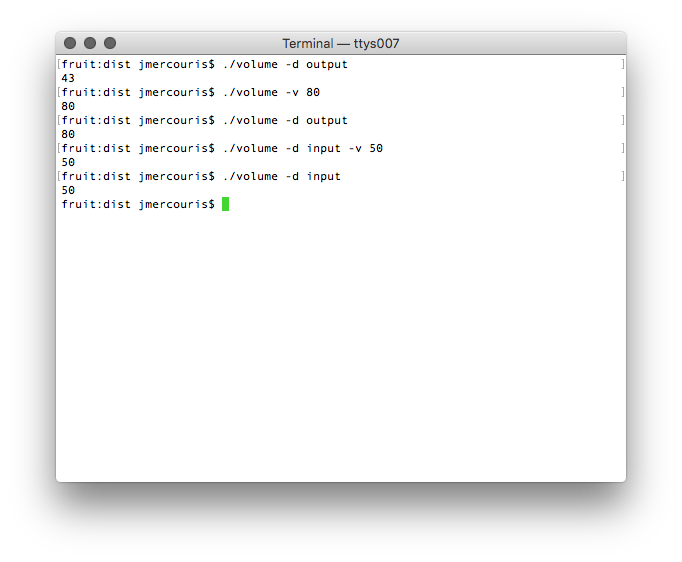
Demonstrating the command line argument functionality available
Thanks for reading!
I hope you enjoyed reading this article, and maybe you can also enjoy using the program yourself!